Centos/RHEL一键搭建socks5服务脚本
Socks5服务一键搭建脚本
稳定版V1.1.8
介绍
一个Shell脚本,集成socks5搭建,管理,启动,添加账号等基本操作。基于socks5官方的辅助脚本,方便用户操作,并且支持快速构建socks5服务环境。
脚本只提供学习交流,请在法律允许范围内使用!!!!
系统支持
CentOS 6.x
CentOS 7.x
谷歌云部分系统问题请看更新日志
功能
全自动无人值守安装,服务端部署只需一条命令)
一键开启、关闭ss5服务
添加账户,删除用户,开启账户验证,关闭账户验证,一键修改端口
支持傻瓜式用户添加,小白也可以用
自动修改防火墙规则
输入 s5 即可启动控制面板
一键安装或更新到最新
wget -q -N --no-check-certificate https://raw.githubusercontent.com/wyx176/Socks5/master/install.sh && bash install.sh
相关文件路径
1.端口文件
/etc/sysconfig/ss52.访问授权配置文件
/etc/opt/ss5/ss5.conf3.用户账号信息文件
/etc/opt/ss5/ss5.passwd4.部分文件修改后需要重启ss5
重启命令:service ss5 restart
更新日志
-2019.05.19 v1.1.8
1.增加自动关闭防火墙
2.修复centos6下启动s5服务时异常提示
3.优化控制面板,选择更新时可以看到更新的内容
-2019.05.12 v1.1.7
1.优化控制面板
2.增加版本显示,有新版本会提示更新
3.增加一键更新到最新版本
-2019.05.09 v1.1.6
1.修复开机不会自动启动的bug
-2019.03.23 v1.1.5
1.解决谷歌云部分系统搭建后异常问题
问题:使用谷歌云搭建失败、搭建后无法正常使用、无法启动控制面。
推测原因:帐号权限不够完整。
解决方案:使用ssh软件(xshell)通过root权限账户登录,然后正常搭建即可。参考视频http://t.cn/EJzT2YR
2.执行命令出现 wget:command not found
解决方案:先执行命令
yum -y install wget
然后正常搭建。
-2019.03.21 v1.1.5
1.重写安装代码,优化安装过程。
2.测试了以下系统都能正常使用:
CentOS-7.0-x86_64
CentOS-7.3-x86_64
centos-7.4-x86_64
centos-7.5-x86_64
centos-7.6-x86_64
CentOS-6.4-x86_64
CentOS-6.4-86
centos-6.9-x86_64
工作中经常用VPN访问国外,但是同时国内的速度又慢了,让人很纠结,实际上这个时候可以考虑使用socks。指定某一个程序使用国外socks即可。这样国内国外速度同时有保证。
SOCKS是什么:防火墙安全会话转换协议 (Socks: Protocol for sessions traversal across firewall securely) SOCKS 协议提供一个框架,为在 TCP 和 UDP 域中的客户机/服务器应用程序能更方便安全地使用网络防火墙所提供的服务。这个协议从概念上来讲是介于应用层和传输层之间的 “中介层(shim-layer)”,因而不提供如传递 ICMP 信息之类的网络层网关服务。
开始我们的socks之旅吧,安装配置一直到最后的测试,请接着往下看。
1. 安装socks 5
1.1 安装依赖开发库
# yum install pam-devel openldap-devel openssl-devel |
1.2 安装socks 5
# wget http://downloads.sourceforge.net/project/ss5/ss5/3.8.9-8/ss5-3.8.9-8.tar.gz?r=&ts=1396802581&use_mirror=cznic |
# tar -xzvf ss5-3.8.9-8.tar.gz |
# cd ss5-3.8.9 |
# ./configure |
# make |
# make install |
2. socks 5配置
2.1 修改配置文件
# vim /etc/opt/ss5/ss5.conf |
auth 0.0.0.0/0 – - |
改为 |
auth 0.0.0.0/0 – u |
permit – 0.0.0.0/0 – 0.0.0.0/0 – – – – - |
改成为 |
permit u 0.0.0.0/0 – 0.0.0.0/0 – – – – - |
3. 添加socket 5用户
# cat /etc/opt/ss5/ss5.passwd |
##用户 密码 |
ttlsa 123456 |
4. 启动socket 5
# sh /etc/rc.d/init.d/ss5 start |
doneting ss5... |
默认情况ss5文件没有执行权限,如果觉得使用sh来启动麻烦,那么按如下方法:
# chmod u+x /etc/rc.d/init.d/ss5 |
# chkconfig --add ss5 //可选 |
# chkconfig ss5 on //可选 |
# service ss5 start |
5. 查看是否启动
# netstat -lntp | grep ss5 |
tcp 0 0 0.0.0.0:1080 0.0.0.0:* LISTEN 14262/ss5 |
默认端口1080
6. 测试socks5
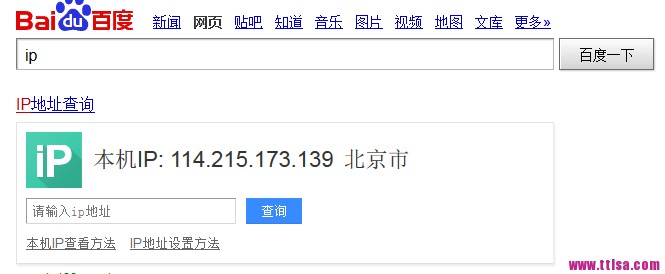
安装Proxifier,默认情况所有请求都走socks5.打开百度,输入IP,可以看到如下结果是我们运维生存时间(ttlsa.com)的ip地址
7. 常见错误
7.1 缺少PAM
configure: error: *** Some of the headers weren't found *** |
# yum -y install pam-devel |
8. 结束
下面是socks5一键安装脚本内容。
#!/bin/sh
export PATH=/usr/local/sbin:/usr/local/bin:/sbin:/bin:/usr/sbin:/usr/bin
#Check OS
if [ -n "$(grep 'Aliyun Linux release' /etc/issue)" -o -e /etc/redhat-release ]; then
OS=CentOS
[ -n "$(grep ' 7\.' /etc/redhat-release)" ] && CentOS_RHEL_version=7
[ -n "$(grep ' 6\.' /etc/redhat-release)" -o -n "$(grep 'Aliyun Linux release6 15' /etc/issue)" ] && CentOS_RHEL_version=6
[ -n "$(grep ' 5\.' /etc/redhat-release)" -o -n "$(grep 'Aliyun Linux release5' /etc/issue)" ] && CentOS_RHEL_version=5
elif [ -n "$(grep 'Amazon Linux AMI release' /etc/issue)" -o -e /etc/system-release ]; then
OS=CentOS
CentOS_RHEL_version=6
elif [ -n "$(grep bian /etc/issue)" -o "$(lsb_release -is 2>/dev/null)" == 'Debian' ]; then
OS=Debian
[ ! -e "$(which lsb_release)" ] && {
apt-get -y update
apt-get -y install lsb-release
clear
}
Debian_version=$(lsb_release -sr | awk -F. '{print $1}')
elif [ -n "$(grep Deepin /etc/issue)" -o "$(lsb_release -is 2>/dev/null)" == 'Deepin' ]; then
OS=Debian
[ ! -e "$(which lsb_release)" ] && {
apt-get -y update
apt-get -y install lsb-release
clear
}
Debian_version=$(lsb_release -sr | awk -F. '{print $1}')
elif [ -n "$(grep Ubuntu /etc/issue)" -o "$(lsb_release -is 2>/dev/null)" == 'Ubuntu' -o -n "$(grep 'Linux Mint' /etc/issue)" ]; then
OS=Ubuntu
[ ! -e "$(which lsb_release)" ] && {
apt-get -y update
apt-get -y install lsb-release
clear
}
Ubuntu_version=$(lsb_release -sr | awk -F. '{print $1}')
[ -n "$(grep 'Linux Mint 18' /etc/issue)" ] && Ubuntu_version=16
else
echo "Does not support this OS, Please contact the author! "
kill -9 $$
fi
#Install Basic Tools
if [[ ${OS} == Ubuntu ]]; then
echo ""
echo "***********************"
echo "*目前不支持Ubuntu系统!*"
echo "*请使用CentOS搭建 *"
echo "**********************"
exit 0
apt-get install git unzip wget -y
fi
if [[ ${OS} == CentOS ]]; then
yum install git unzip wget -y
fi
if [[ ${OS} == Debian ]]; then
echo "***********************"
echo "*目前不支持Debian系统!*"
echo "*请使用CentOS搭建 *"
echo "**********************"
apt-get install git unzip wget -y
fi
#1.清理旧环境和配置新环境
Clear() {
unInstall
clear
echo "旧环境清理完毕!"
echo ""
echo "安装Socks5所依赖的组件,请稍等..."
yum -y install gcc gcc-c++ automake make pam-devel openldap-devel cyrus-sasl-devel openssl-devel
yum update -y nss curl libcurl
#配置环境变量
sed -i '$a export PATH=$PATH:/usr/local/sbin:/usr/local/bin:/sbin:/bin:/usr/sbin:/usr/bin' ~/.bash_profile
source ~/.bash_profile
#关闭防火墙
newVersion=$(cat /etc/redhat-release | sed -r 's/.* ([0-9]+)\..*/\1/')
if [[ ${newVersion} = "7" ]]; then
systemctl stop firewalld
systemctl disable firewalld
elif [[ ${newVersion} = "6" ]]; then
service iptables stop
chkconfig iptables off
else
echo "Exception version"
fi
}
#2.下载Socks5服务
Download() {
echo ""
echo "下载Socks5服务中..."
cd /root
git clone https://github.com/wyx176/Socks5
}
#3.安装Socks5服务程序
InstallSock5() {
echo ""
echo "解压文件中..."
cd /root/Socks5
tar zxvf ./ss5-3.8.9-8.tar.gz
echo "安装中..."
cd /root/Socks5/ss5-3.8.9
./configure
make
make install
}
#4.安装控制面板配置参数
InstallPanel() {
#cd /root/Socks5
mv /root/Socks5/service.sh /etc/opt/ss5/
mv /root/Socks5/user.sh /etc/opt/ss5/
mv /root/Socks5/version.txt /etc/opt/ss5/
mv /root/Socks5/ss5 /etc/sysconfig/
mv /root/Socks5/s5 /usr/local/bin/
chmod +x /usr/local/bin/s5
#设置默认用户名、默认开启帐号验证
uname="123456"
upasswd="654321"
port="5555"
confFile=/etc/opt/ss5/ss5.conf
echo -e $uname $upasswd>>/etc/opt/ss5/ss5.passwd
sed -i '87c auth 0.0.0.0/0 - u' $confFile
sed -i '203c permit u 0.0.0.0/0 - 0.0.0.0/0 - - - - -' $confFile
#添加开机启动
chmod +x /etc/init.d/ss5
chkconfig --add ss5
chkconfig --level 345 ss5 on
confFile=/etc/rc.d/init.d/ss5
sed -i '/echo -n "Starting ss5... "/a if [ ! -d "/var/run/ss5/" ];then mkdir /var/run/ss5/; fi' $confFile
sed -i '54c rm -rf /var/run/ss5/' $confFile
sed -i '18c [[ ${NETWORKING} = "no" ]] && exit 0' $confFile
#判断ss5文件夹是否存在、
if [ ! -d "/var/run/ss5/" ]; then
mkdir /var/run/ss5/
echo "create ss5 success!"
else
echo "/ss5/ is OK!"
fi
}
#5.检测是否安装完整
check() {
cd /root
rm -rf /root/Socks5
rm -rf /root/install.sh
errorMsg=""
isError=false
if [ ! -f "/usr/local/bin/s5" ]; then
errorMsg=${errorMsg}"001|"
isError=true
fi
if [ ! -f "/etc/opt/ss5/service.sh" ]; then
errorMsg=${errorMsg}"002|"
isError=true
fi
if [ ! -f "/etc/opt/ss5/user.sh" ]; then
errorMsg=${errorMsg}"003|"
isError=true
fi
if [ ! -f "/etc/opt/ss5/ss5.conf" ]; then
errorMsg=${errorMsg}"004|"
isError=true
fi
if [ "$isError" = "true" ]; then
unInstall
clear
echo ""
echo "缺失文件,安装失败!!!"
echo "错误提示:"${errorMsg}
echo "发送邮件反馈bug :wyx176@gmail.com"
echo "或者添加Telegram群反馈"
echo "Telegram群:t.me/Socks55555"
exit 0
else
clear
echo ""
#service ss5 start
if [[ ${newVersion} = "7" ]]; then
systemctl daemon-reload
fi
service ss5 start
echo ""
echo "Socks5安装完毕!"
echo ""
echo "输入"s5"启动Socks5控制面板"
echo ""
echo "默认用户名: "${uname}
echo "默认密码 : "${upasswd}
echo "默认端口 : "${port}
echo ""
echo "添加Telegram群组@Socks55555及时获取更新"
echo ""
exit 0
fi
}
#6.卸载
unInstall() {
service ss5 stop
rm -rf /run/ss5
rm -f /run/lock/subsys/ss5
rm -rf /etc/opt/ss5
rm -f /usr/local/bin/s5
rm -rf /usr/lib/ss5
rm -f /usr/sbin/ss5
rm -rf /usr/share/doc/ss5
rm -rf /root/ss5-3.8.9
rm -f /etc/sysconfig/ss5
rm -f /etc/rc.d/init.d/ss5
rm -f /etc/pam.d/ss5
rm -rf /var/log/ss5
}
Clear
Download
InstallSock5
InstallPanel
check
目录 返回
首页
