Install Asterisk 18 LTS on CentOS 8 | RHEL 8
Install Asterisk 18 LTS on CentOS 8 | RHEL 8
Asterisk is a free to use, opensource and powerful communication system powering many IP PBX systems, VoIP gateways, conference servers used in SMBs, enterprises, call centers, carriers and government institutions around the globe. Installing Asterisk Server is the first step towards implementation of an affordable, reliable and highly available PBX and VoIP systems.
In today’s guide we will be covering the installation and configuration of Asterisk 18 LTS on CentOS 8 | RHEL 8. Asterisk 18.0 was recently released for production use and is available for download. This is an LTS release, meaning it will be supported for a few several years. If you’re using earlier releases of Asterisk such as 16 LTS or 17.x it is the right time to plan for upgrade.
Features of Asterisk PBX system
Conference calling
Call Recording
Call Monitoring
Distributed Universal Number Discovery
Caller ID on Call Waiting
Direct Inward System Access
Call Parking
SMS Messaging
Trunking
Transcoding
Automated Attendant
Voicemail
Music on Hold
Music on Transfer
Authentication
Blacklists
Alarm receiver
Call Queues and many other features.
Install Asterisk 18 LTS on CentOS 8 | RHEL 8
In the next sections we will be walking you though the installation of Asterisk 18 LTS on CentOS 8 | RHEL 8 system. It is assumed that you’re performing the tasks on a freshly configured CentOS 8 / RHEL 8 server. This is a recommendation to ensure you don’t break dependencies of any running applications.
Step 1: Update system and set timezone
Before you start Asterisk installation ensure the system is updated.
sudo yum -y update
Once the system has been updated perform a reboot.
sudo systemctl reboot
Wait for the server to be rebooted then set the correct hostname.
sudo hostnamectl set-hostname asterisk.example.com
Also update timezone.
sudo timedatectl set-timezone Africa/Nairobi
Additionally set SELinux in Permissive mode by running the commands below:
sudo setenforce 0
sudo sed -i 's/\(^SELINUX=\).*/\SELINUX=permissive/' /etc/selinux/config
Step 2: Add EPEL Repository
Add EPEL repository to your CentOS 8 | RHEL 8 server as it may contain packages required as deps.
CentOS 8:
sudo yum -y install epel-release
sudo yum config-manager --set-enabled PowerTools
RHEL 8:
sudo yum -y install https://dl.fedoraproject.org/pub/epel/epel-release-latest-8.noarch.rpm
ARCH=$( /bin/arch )
sudo subscription-manager repos --enable "codeready-builder-for-rhel-8-${ARCH}-rpms
Step 3: Install Development Tools
Install all the required Development tools for building Asterisk 18 on CentOS 8 | RHEL 8 from source.
sudo yum group -y install "Development Tools"
sudo yum -y install git wget vim  net-tools sqlite-devel psmisc ncurses-devel libtermcap-devel newt-devel libxml2-devel libtiff-devel gtk2-devel libtool libuuid-devel subversion kernel-devel kernel-devel-$(uname -r) crontabs cronie-anacron libedit libedit-devel
Step 4: Download and Install Jansson
We’ll also install Jansson which is a C library for media data encoding and decoding.
git clone https://github.com/akheron/jansson.gitcd jansson
autoreconf -i
./configure --prefix=/usr/
make
sudo make install
Step 5: Download and Install PJSIP
PJSIP is a powerful multimedia communication library written in C language. It is used in implementation of standard based protocols such as SIP, SDP, RTP, STUN, TURN, and ICE.
Build PJSIP from source by running the following commands in your terminal.
cd ~
git clone https://github.com/pjsip/pjproject.gitcd pjproject
./configure CFLAGS="-DNDEBUG -DPJ_HAS_IPV6=1" --prefix=/usr --libdir=/usr/lib64 --enable-shared --disable-video --disable-sound --disable-opencore-amr
make dep
make
sudo make install
sudo ldconfig
Step 6: Download and Install Asterisk
Now that we have all dependency packages installed, we should be ready to download and install Asterisk 15 on CentOS / RHEL 8.
cd ~
wget http://downloads.asterisk.org/pub/telephony/asterisk/asterisk-18-current.tar.gztar xvfz asterisk-18-current.tar.gz
cd asterisk-18*/
Install libedit packages.
sudo dnf -y install https://rpmfind.net/linux/fedora/linux/releases/29/Everything/x86_64/os/Packages/l/libedit-3.1-24.20170329cvs.fc29.x86_64.rpm
sudo dnf -y install https://rpmfind.net/linux/fedora/linux/releases/29/Everything/x86_64/os/Packages/l/libedit-devel-3.1-24.20170329cvs.fc29.x86_64.rpm
Configure Asterisk.
./configure --libdir=/usr/lib64
A successful configuration should print output like below.
.....
configure: Menuselect build configuration successfully completed

               .$$$$$$$$$$$$$$$=..
            .$7$7..          .7$$7:.
          .$$:.                 ,$7.7
        .$7.     7$$$$           .$$77
     ..$$.       $$$$$            .$$$7
    ..7$   .?.   $$$$$   .?.       7$$$.
   $.$.   .$$$7. $$$$7 .7$$$.      .$$$.
 .777.   .$$$$$$77$$$77$$$$$7.      $$$,
 $$$~      .7$$$$$$$$$$$$$7.       .$$$.
.$$7          .7$$$$$$$7:          ?$$$.
$$$          ?7$$$$$$$$$$I        .$$$7
$$$       .7$$$$$$$$$$$$$$$$      :$$$.
$$$       $$$$$$7$$$$$$$$$$$$    .$$$.
$$$        $$$   7$$$7  .$$$    .$$$.
$$$$             $$$$7         .$$$.
7$$$7            7$$$$        7$$$
 $$$$$                        $$$
  $$$$7.                       $$  (TM)
   $$$$$$$.           .7$$$$$$  $$
     $$$$$$$$$$$$7$$$$$$$$$.$$$$$$
       $$$$$$$$$$$$$$$$.

configure: Package configured for:
configure: OS type  : linux-gnu
configure: Host CPU : x86_64
configure: build-cpu:vendor:os: x86_64 : pc : linux-gnu :
Step 7: Set Asterisk menu options
Setup menu options by running the following command:
make menuselect
Use arrow keys to navigate, and Enter key to select.
1. Under Add-ons select chan_ooh323 and format_mp3 as shown below

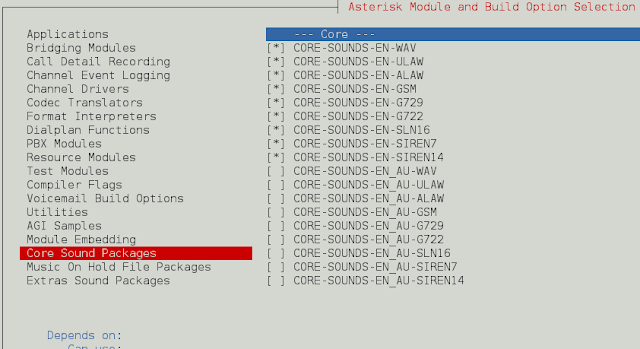
2. On Core Sound Packages, select the formats of Audio packets like below

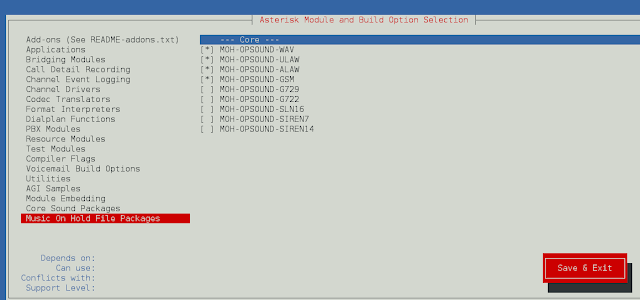
3. For Music On Hold, select the following minimal modules

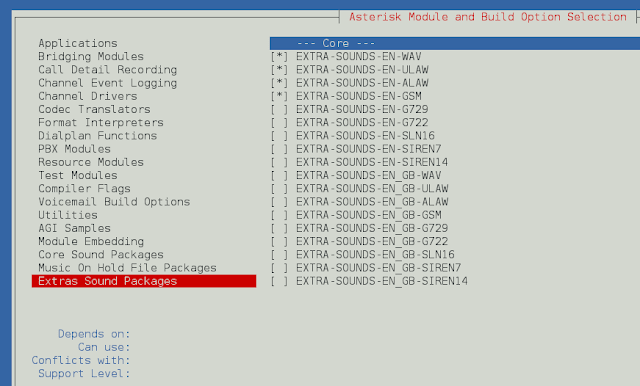
5. On Extra Sound Packages select as shown below:

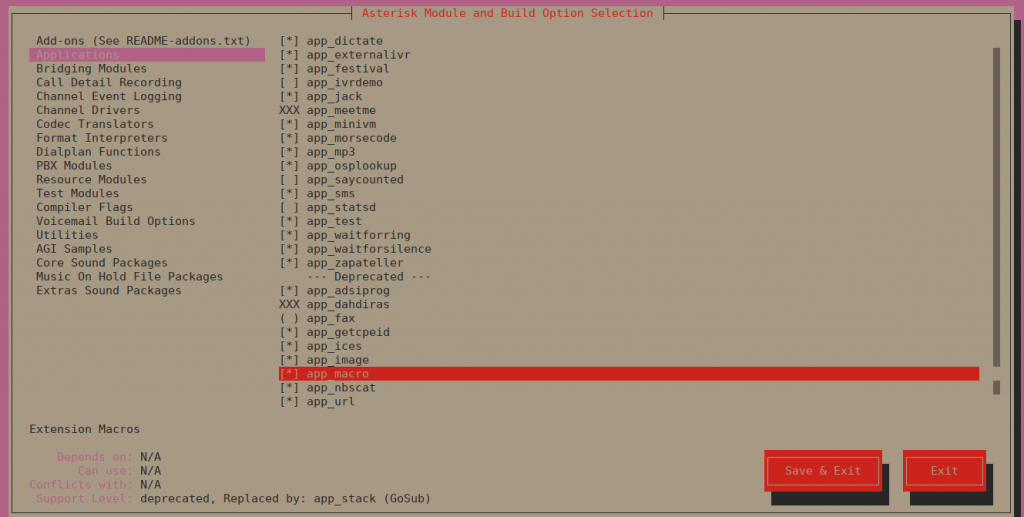
6. Enable app_macro under Applications section.

Feel free to modify other settings to suit your needs then save and exit when done.
Step 8: Build and Install Asterisk
Run the following command to download the mp3 decoder library into the source tree.
contrib/scripts/get_mp3_source.sh
Build and install Asterisk on CentOS 8 | RHEL 8:
make
sudo make install
sudo make samples
sudo make config
sudo ldconfig
Step 9: Configure and Start Asterisk
Create a separate user and group to run asterisk services, and assign correct permissions:
sudo groupadd asterisk
sudo useradd -r -d /var/lib/asterisk -g asterisk asterisk
sudo usermod -aG audio,dialout asterisk
sudo chown -R asterisk.asterisk /etc/asterisk /var/{lib,log,spool}/asterisk /usr/lib64/asterisk
Set Asterisk default user to asterisk:
$
AST_USER="asterisk"
AST_GROUP="asterisk"

$
runuser = asterisk ; The user to run as.
rungroup = asterisk ; The group to run as.
After saving the changes in the configuration file restart asterisk service.
sudo systemctl restart asterisk
Enable service to be started whenever the server is rebooted.
sudo systemctl enable asterisk
Confirm service status using the following command:
$ systemctl status asterisk
● asterisk.service - LSB: Asterisk PBX
   Loaded: loaded (/etc/rc.d/init.d/asterisk; generated)
   Active: active (running) since Mon 2021-01-11 19:00:39 EAT; 2s ago
     Docs: man:systemd-sysv-generator(8)
  Process: 107586 ExecStop=/etc/rc.d/init.d/asterisk stop (code=exited, status=0/SUCCESS)
  Process: 107616 ExecStart=/etc/rc.d/init.d/asterisk start (code=exited, status=0/SUCCESS)
 Main PID: 107650 (asterisk)
    Tasks: 84 (limit: 4763)
   Memory: 68.7M
   CGroup: /system.slice/asterisk.service
           ├─107648 /bin/sh /usr/sbin/safe_asterisk
           └─107650 /usr/sbin/asterisk -f -vvvg -c

Jan 11 19:00:39 asterisk.example.com systemd[1]: asterisk.service: Succeeded.
Jan 11 19:00:39 asterisk.example.com systemd[1]: Stopped LSB: Asterisk PBX.
Jan 11 19:00:39 asterisk.example.com systemd[1]: Starting LSB: Asterisk PBX...
Jan 11 19:00:39 asterisk.example.com asterisk[107616]: Starting asterisk:
Jan 11 19:00:39 asterisk.example.com systemd[1]: Started LSB: Asterisk PBX.
Test with asterisk command to confirm Asterisk CLI is working:
[centos@asterisk]$ sudo asterisk -rvv
 Asterisk 18.1.1, Copyright (C) 1999 - 2018, Digium, Inc. and others.
 Created by Mark Spencer markster@digium.com
 Asterisk comes with ABSOLUTELY NO WARRANTY; type 'core show warranty' for details.
 This is free software, with components licensed under the GNU General Public
 License version 2 and other licenses; you are welcome to redistribute it under
 certain conditions. Type 'core show license' for details.
 Running as user 'asterisk'
 Running under group 'asterisk'
 Connected to Asterisk 18.1.1 currently running on asterisk (pid = 107650)
 asterisk*CLI>

asterisk*CLI> core show channelsChannel              Location             State   Application(Data)
0 active channels
0 active calls
0 calls processed

asterisk*CLI> core show  uptime System uptime: 2 minutes, 53 seconds
Last reload: 2 minutes, 53 seconds

asterisk*CLI> quitAsterisk cleanly ending (0).
Executing last minute cleanups
Step 10: Install FreePBX
If you need a UI based administrative dashboard for Asterisk, then check How to Install FreePBX on RHEL / CentOS 8
This marks the end of our article on the installation of Asterisk 18 LTS on CentOS 8 | RHEL 8 Linux server. In our next articles we will be looking at how integrate Asterisk with other platforms to build creative and amazing VoIP based solutions.
How to secure Asterisk and FreePBX from VoIP Fraud and Bruteforce attacks
目录 返回
首页