完整部署CentOS7.2+OpenStack+kvm 云平台环境(5)--问题解决
一、
[root@openstack-server ~]# nova list
ERROR (CommandError): You must provide a username or user id via --os-username, --os-user-id, env[OS_USERNAME] or env[OS_USER_ID]
解决办法:
source一下环境变量来获取 token
[root@openstack-server src]# source admin-openrc.sh
[root@openstack-server src]# nova list
+--------------------------------------+--------------+--------+------------+-------------+--------------------+
| ID | Name | Status | Task State | Power State | Networks |
+--------------------------------------+--------------+--------+------------+-------------+--------------------+
| 056c37a4-3e94-4280-96dd-5bc003469647 | kvmserver-01 | ACTIVE | - | Running | flat=192.168.1.121 |
+--------------------------------------+--------------+--------+------------+-------------+--------------------+
二、
在进行keystone认证的时候,出现下面的报错:
Maximum lock attempts on _lockusertokens-0b75ff3ce97a40caa6bf6753c962c82b occurred. (Disable debug mode to suppress these details.) (HTTP 500) (Request-ID: req-bb1c465e-33bc-412a-8ac2-c0d0a7e168ad)
或者
An unexpected error prevented the server from fulfilling your request. (HTTP 500) (Request-ID: req-bb1c465e-33bc-412a-8ac2-c0d0a7e168ad)
问题产生的可能原因及解决办法:
1)admin_token用户环境变量错误引起的。
解决办法:
[root@linux-node1 ~]# export OS_TOKEN=35d6e6f377a889571bcf
[root@linux-node1 ~]# export OS_URL=http://192.168.1.17:35357/v3
[root@linux-node1 ~]# export OS_IDENTITY_API_VERSION=3
2)keystone数据同步失败,没有获取到正确的token值引起的。
解决办法:
删除mysql数据库中的keystone库,重新创建keystone库;
重新生成一个token,在keystone.conf中重新指定admin_token对应的新的token指;
然后初始化keystone数据,重启memcaced服务,重新进行keystone的认证;
3)获取的token无效引起的。
解决办法:修改keystone.conf文件中的[token]区域。
之前的配置,将token存放在memcache缓存中
[token]
provider = uuid //或者是provider = keystone.token.providers.uuid.Provider
driver = memcache //或者是driver = keystone.token.persistence.backends.memcache.Token
修改后的配置,将token存放在sql数据库中
[token]
provider = uuid
driver = keystone.token.persistence.backends.sql.Token
----------------------------------------------------------------------------------------------------------------------------------------------
说明下:
keystone默认使用SQL数据库存储token,token默认有效期为1天(24h)。
Openstack中每个组件执行的每次命令(请求)都需要token来验证,每次访问都会创建token,增长速度非常快,token表数据也会越来越多。
随着时间的推移,无效的记录越来越多,企业私有云几天的量就可以几万条、几十万条。这么多无效的token导致针对token表的SQL语句变慢,性能也会变差!
这就需要手动写个定时脚本来清理token表。
但是更好的方法当然是将token存放在memcache缓存中,利用memcached特性,自动删除不使用的缓存:
[memcache]
servers = localhost:11211
[token]
provider = keystone.token.providers.uuid.Provider
driver = keystone.token.persistence.backends.memcache.Token
默认的配置是:
[token]
provider = keystone.token.providers.uuid.Provider
driver = keystone.token.persistence.backends.sql.Token
--------------------------------------------------------------------------------------------------------------------------------------------
三、
No handlers could be found for logger "oslo_config.cfg"
原因:日志文件的配置项错误
解决办法:
在/etc/keystone/keystone.conf、/etc/nova/nova.conf配置文件里修改logdir为:
log_dir=/var/log/keystone
log_dir=/var/log/nova
四、
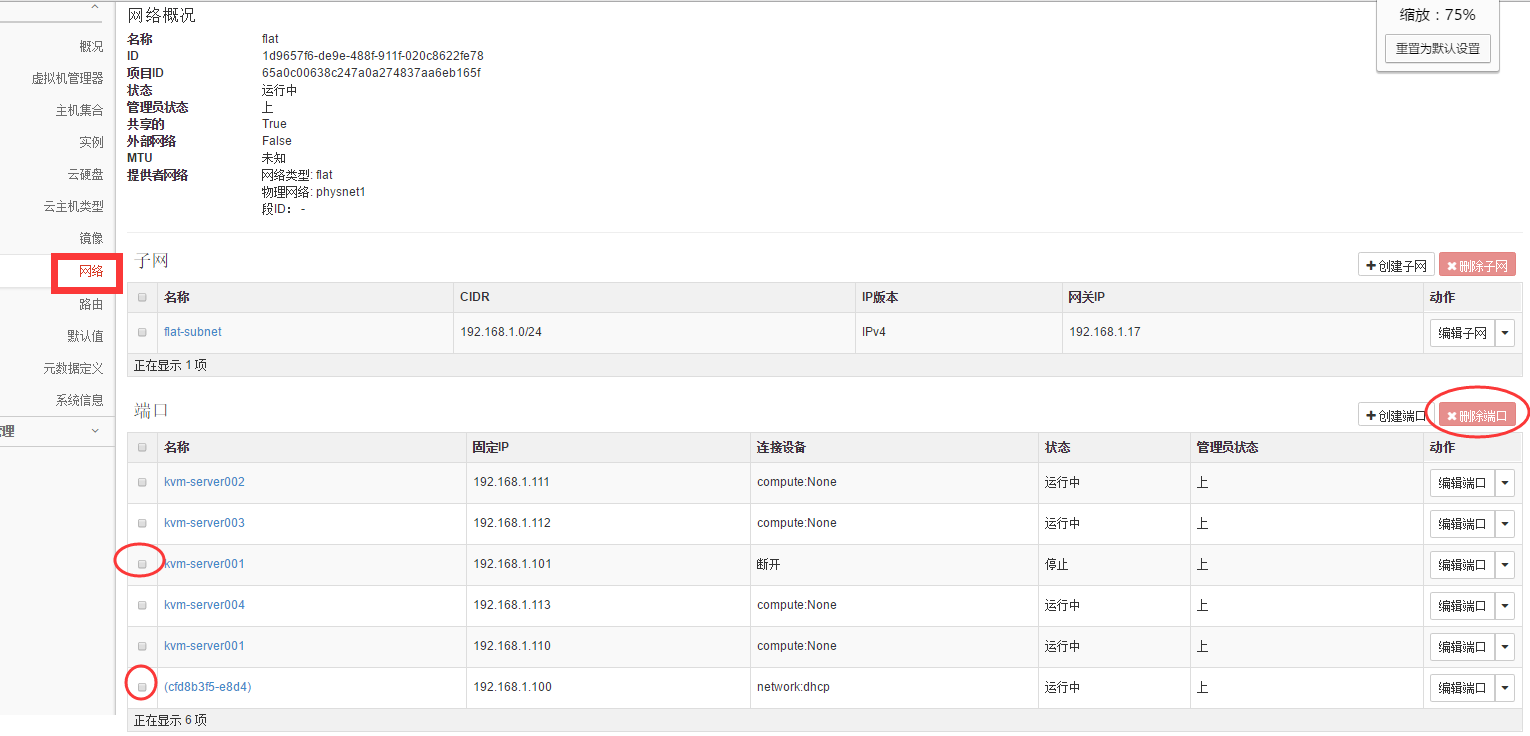
之前在openstack里创建的虚拟机,后面删除了。但是再创建虚拟机并设置和之前删除的虚拟机一样的ip的时候,就报错说这个ip已经被占用了!
但是之前创建的虚拟机已经删除了,这是为什么?
这是因为虚拟机虽然删除了,但是所删除虚拟机在neutron组网内的ip还没有被真正释放出来。
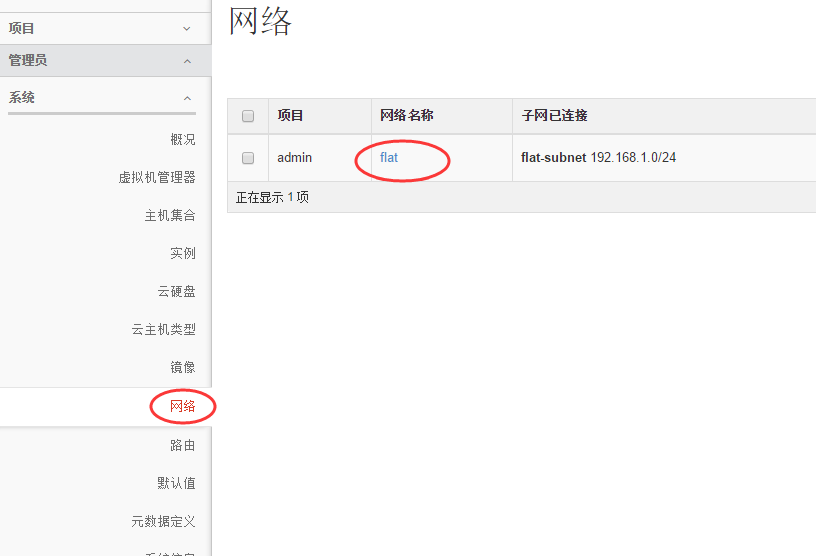
需要登陆openstack的web界面,到“网络”部分里面进行删除:


五、
在上传镜像或查看镜像的时候,报错:
[root@linux-node1 ~]# glance image-list
500 Internal Server Error: The server has either erred or is incapable of performing the requested operation. (HTTP 500)
测试登陆数据库,发现登陆失败!
[root@linux-node1 ~]# mysql -u glance -h 192.168.1.17 -p
Enter password:
ERROR 1040 (08004): Too many connections
解决办法,这也是centos7下修改mysql连接数的做法:
1)临时修改
MariaDB [(none)]> set GLOBAL max_connections=1000;
Query OK, 0 rows affected (0.00 sec)
MariaDB [(none)]> show variables like "max_connections";
+-----------------+-------+
| Variable_name | Value |
+-----------------+-------+
| max_connections | 1000 |
+-----------------+-------+
1 row in set (0.00 sec)
2)永久修改:
配置/etc/my.cnf
[mysqld]新添加一行如下参数:
max_connections=1000
重启mariadb服务,再次查看mariadb数据库最大连接数,可以看到最大连接数是214,并非我们设置的1000。
MariaDB [(none)]> show variables like 'max_connections';
+-----------------+-------+
| Variable_name | Value |
+-----------------+-------+
| max_connections | 214 |
+-----------------+-------+
这是由于mariadb有默认打开文件数限制。可以通过配置/usr/lib/systemd/system/mariadb.service来调大打开文件数目。
配置/usr/lib/systemd/system/mariadb.service
[Service]新添加两行如下参数:
LimitNOFILE=10000
LimitNPROC=10000
重新加载系统服务,并重启mariadb服务
systemctl --system daemon-reload
systemctl restart mariadb.service
再次查看mariadb数据库最大连接数,可以看到最大连接数已经是1000
MariaDB [(none)]> show variables like 'max_connections';
+-----------------+-------+
| Variable_name | Value |
+-----------------+-------+
| max_connections | 1000 |
+-----------------+-------+
六、
openstack创建虚拟机后,vnc进入vm后发现:
ifconfig命令没有看到eth0信息
[root@localhost ~]# ifconfig
lo Link encap:Local Loopback
inet addr:127.0.0.1 Mask:255.0.0.0
inet6 addr: ::1/128 Scope:Host
UP LOOPBACK RUNNING MTU:16436 Metric:1
RX packets:0 errors:0 dropped:0 overruns:0 frame:0
TX packets:0 errors:0 dropped:0 overruns:0 carrier:0
collisions:0 txqueuelen:0
RX bytes:0 (0.0 b) TX bytes:0 (0.0 b)
重启网卡又报下面错误。
[root@localhost ~]# service network restart
Shutting down loopback insterface: [ OK ]
Bringing up loopback insterface: [ OK ]
Bringing up interface eth0: Device eth0 does not seem to be present,delaying initialization. [FAILED]

解决办法:
首先,打开/etc/udev/rules.d/70-persistent-net.rules内容如下面例子所示:
[root@localhost ~]# cat /etc/udev/rules.d/70-persistent-net.rules
# This file was automatically generated by the /lib/udev/write_net_rules
# program, run by the persistent-net-generator.rules rules file.
#
# You can modify it, as long as you keep each rule on a single
# line, and change only the value of the NAME= key.
# PCI device 0x1af4:0x1000 (virtio-pci)
SUBSYSTEM=="net", ACTION=="add", DRIVERS=="?*", ATTR{address}=="52:54:00:f0:f9:1c", ATTR{type}=="1", KERNEL=="eth*", NAME="eth0"
# PCI device 0x1af4:0x1000 (virtio-pci)
SUBSYSTEM=="net", ACTION=="add", DRIVERS=="?*", ATTR{address}=="fa:16:3e:e9:ad:89", ATTR{type}=="1", KERNEL=="eth*", NAME="eth1"
记录下,eth1网卡的mac地址fa:16:3e:e9:ad:89
接下来,打开/etc/sysconfig/network-scripts/ifcfg-eth0
[root@localhost ~]# cat /etc/sysconfig/network-scripts/ifcfg-eth0
DEVICE="eth0"
BOOTPROTO="dhcp"
HWADDR="52:54:00:F0:F9:1C"
IPV6INIT="yes"
NM_CONTROLLED="yes"
ONBOOT="yes"
TYPE="Ethernet"
UUID="af2a1e56-a502-42e9-9359-5c7dd6b1e1e9"
将ifcfg-eth0文件下的DEVICE设备名称改为“eth1”
将mac地址即HWADDR改为上面记录的eth1的地址:fa:16:3e:e9:ad:89
即修改后:
[root@localhost ~]# cat /etc/sysconfig/network-scripts/ifcfg-eth0
DEVICE="eth1"
BOOTPROTO="dhcp"
HWADDR="fa:16:3e:e9:ad:89"
IPV6INIT="yes"
NM_CONTROLLED="yes"
ONBOOT="yes"
TYPE="Ethernet"
UUID="af2a1e56-a502-42e9-9359-5c7dd6b1e1e9"
最后,重启网卡
[root@localhost ~]# /etc/init.d/network restart
Shutting down interface eth0: [ OK ]
Shutting down loopback interface: [ OK ]
Bringing up loopback interface: [ OK ]
Bringing up interface eth0:
Determining IP information for eth1... done.
[ OK ]
然后查看,发现ifconfig后有ip信息了!
[root@localhost ~]# ifconfig
eth1 Link encap:Ethernet HWaddr FA:16:3E:E9:AD:89
inet addr:192.168.1.102 Bcast:192.168.1.255 Mask:255.255.255.0
inet6 addr: fe80::f816:3eff:fee9:ad89/64 Scope:Link
UP BROADCAST RUNNING MULTICAST MTU:1500 Metric:1
RX packets:678 errors:0 dropped:0 overruns:0 frame:0
TX packets:183 errors:0 dropped:0 overruns:0 carrier:0
collisions:0 txqueuelen:1000
RX bytes:78238 (76.4 KiB) TX bytes:27488 (26.8 KiB)
lo Link encap:Local Loopback
inet addr:127.0.0.1 Mask:255.0.0.0
inet6 addr: ::1/128 Scope:Host
UP LOOPBACK RUNNING MTU:16436 Metric:1
RX packets:0 errors:0 dropped:0 overruns:0 frame:0
TX packets:0 errors:0 dropped:0 overruns:0 carrier:0
collisions:0 txqueuelen:0
RX bytes:0 (0.0 b) TX bytes:0 (0.0 b)
七、
openstack上创建vm实例后,状态为ERROR问题解决
解决方法参考:http://www.cnblogs.com/kevingrace/p/6015732.html
目录 返回
首页