docker安装jenkins使用npm容器构建Node.js+实现cicd部署
docker安装jenkins使用npm容器构建Node.js+实现cicd部署
目标: docker中运行jenkins,通过npm容器构建项目,项目资源打包部署到远程主机的目录中。
一、jenkins 的安装
1,配置要求
docker主机IP: 192.168.1.20,系统:centos7 ,需要安装docker,再创建一个jenkins容器,挂载目录: /opt/jenkins 。
部署nginx服务器IP: 192..168.1.41,系统:centos7 ,保存jenkins通过sftp传送过来的项目构建的资源的文件目录:/opt/app,
服务器IP: 192..168.1.41,安装docker,创建一个 nginx容器挂载目录为 /opt/cicd/nginx,用来部署静态资源。
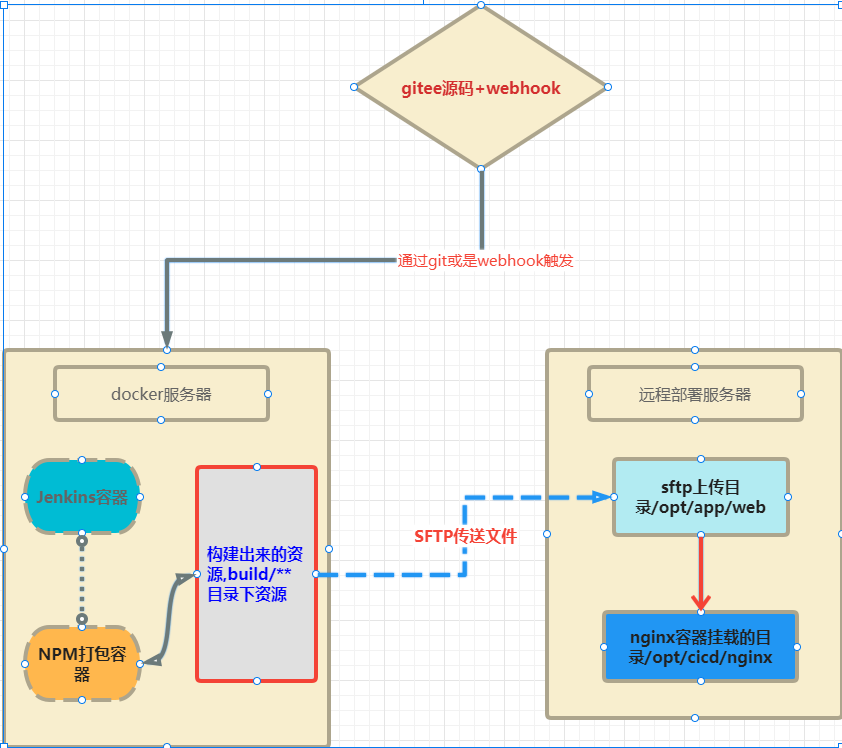
整个流程原理, docker主机安装jenkis-->构建一个nodejs的容器,git源码,打包出静态资源--->通过sftp将打包文件传送到nginx容器所在主机的/opt/app/web目录--->
再将/opt/app/web/目录下的资源,复制到nginx的挂载目录 /opt/cicd/nginx下,当然也可以直接sftp到nginx的目录。
实现项目的静态资源自动化打包部署或是通过webhook触发整个流程。
2,在 Docker 中运行 Jenkins
我们在docker服务器上面为 jenkins 准备挂载的数据目录,为/opt/jenkins,前提是我们已经在服务器上面安装好了 docker。
docker run -d -p 8000:8080 -p 50000:50000 -v /opt/jenkins:/var/jenkins_home \
-e TZ="Asia/Shanghai" --name jenkins --restart=always --privileged=true  -u root jenkins
3,配置 jenkins
使用浏览器打开服务器的 8080 端口,并等待 Unlock Jenkins 页面出现。
可以使用如下命令获取管理员的密码,可以容器或是挂载目录中找到密码:
关于插件的安装我这里也不介绍了, 需要安装 Publish Over SSH, Maven Integration plugin 两个插件。
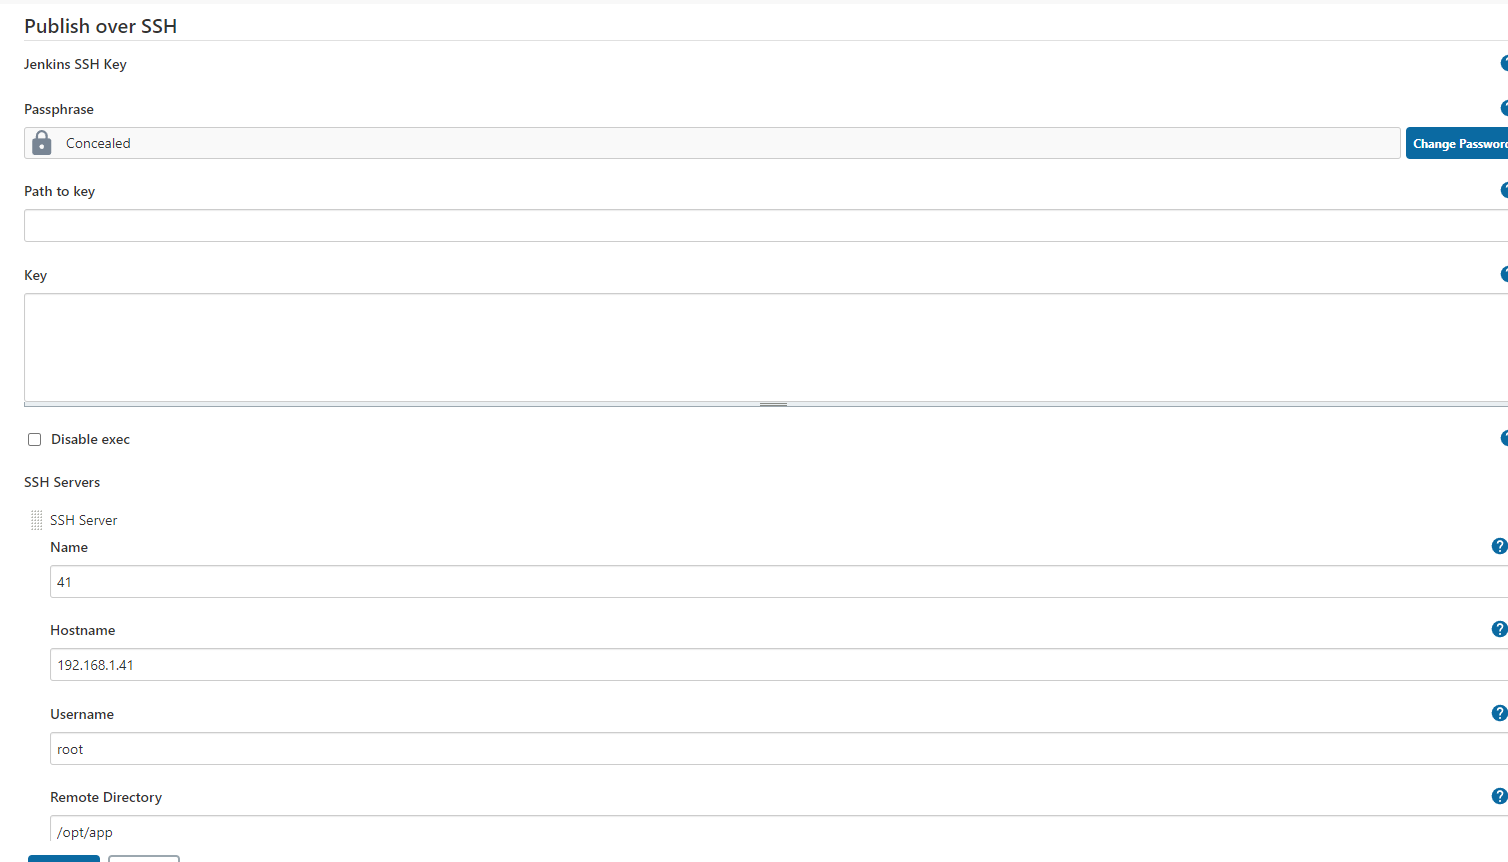
4,在系统管理中添加Publish over SSh主机信息,IP,端口,192.168.1.41所在主机需要上传文件的目录/opt/app, 这个目录在主机上面要提前创建好。
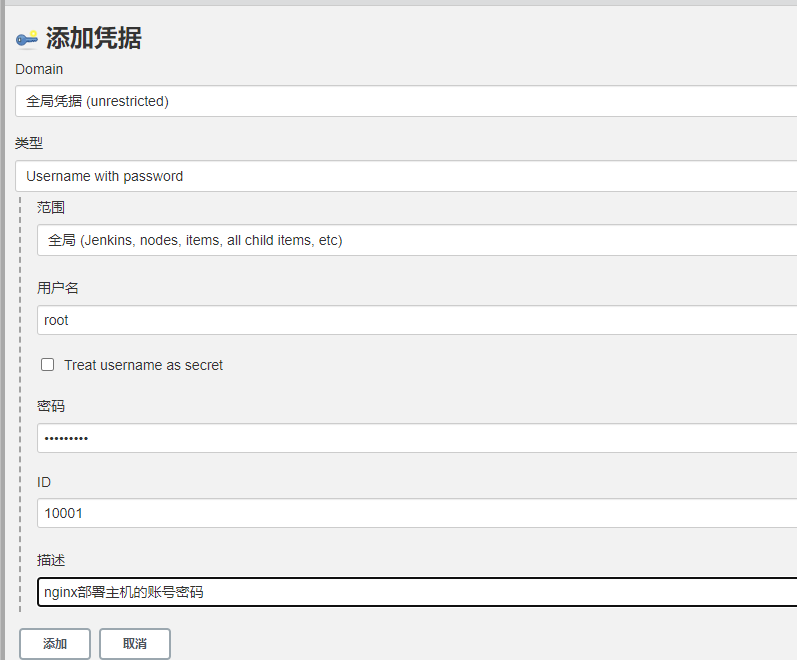
再添加一个凭证,选择账号与密码。凭证的ID不要有重复的。
如下:
5,添加相关账号与密码,不再说明。
二、配置 pipeline
2.1、配置源
我们从 github 上面找一个 nodejs 的案例作为我们的代码源,当然你也可以选择自己的 gitlab或是搞成gitee项目,都一样。。
https://github.com/jenkins-docs/simple-node-js-react-npm-app

或是
https://gitee.com/micoder/simple-node-js-react-npm-app.git/
2.2、创建我们的 pipeline
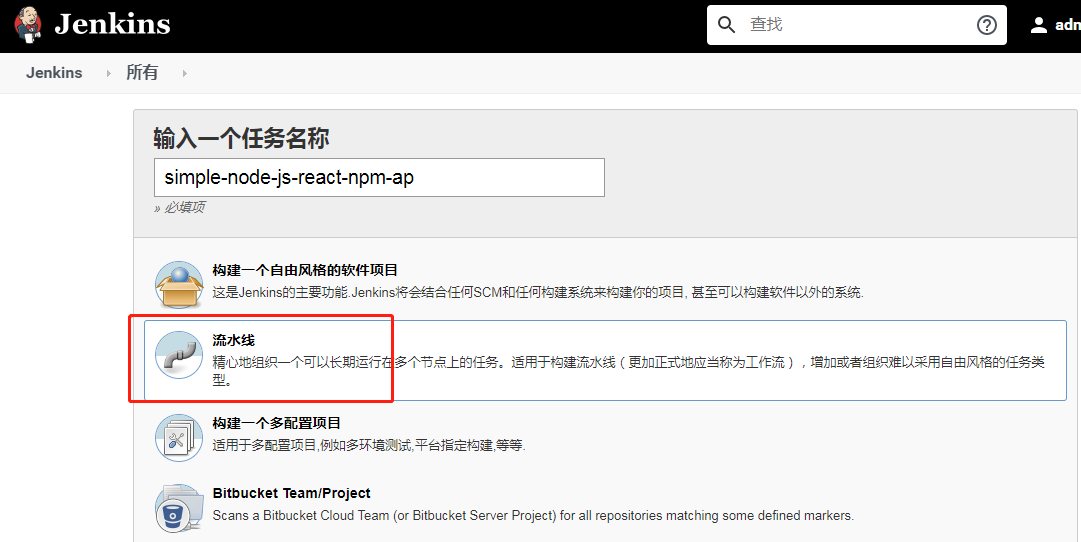
进入首页,点击 New Item
在项目名的地方,我们填写
simple-node-js-react-npm-ap类型我们选择 pipeline
4,至于 项目URL填写哪个无所谓。
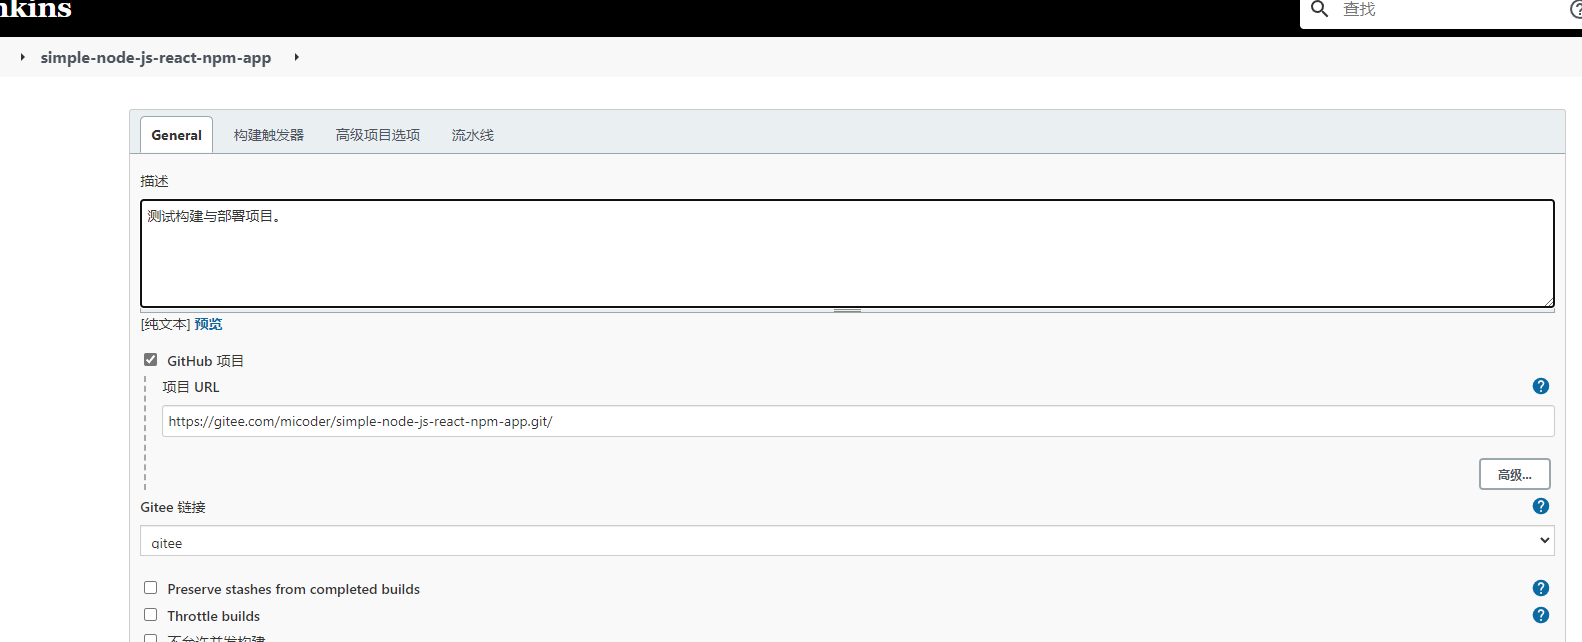
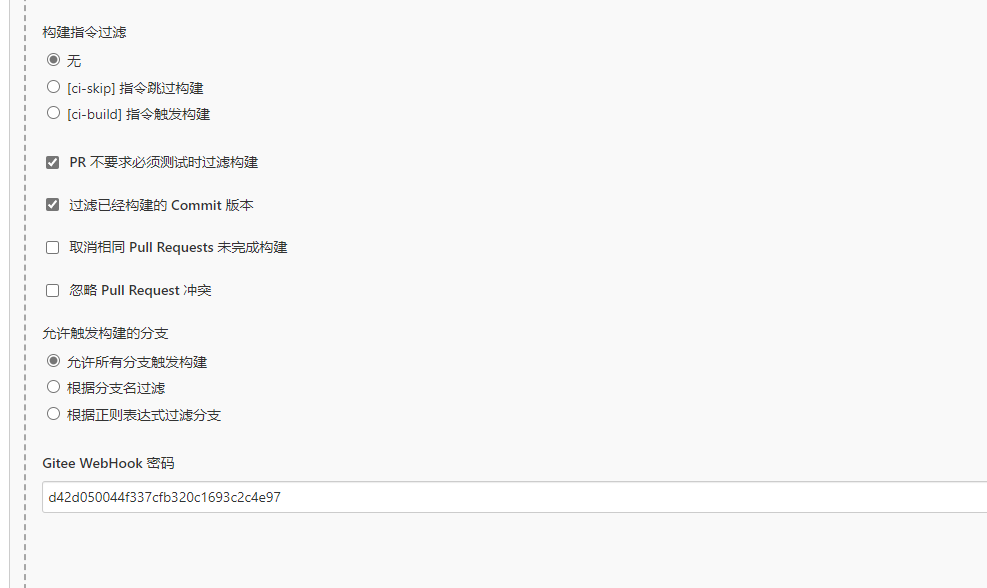
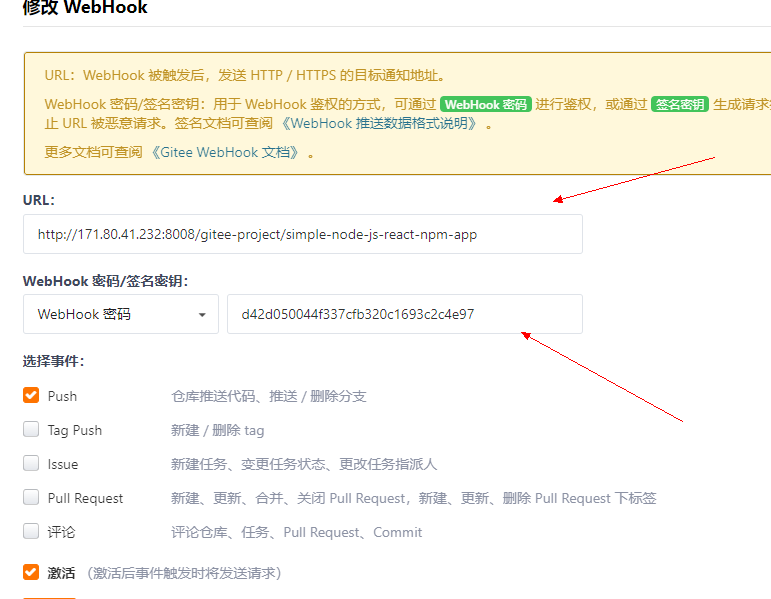
5,生成一个webhook 密码,再到gitee项目中添加相关地址与webhook密码。
我这里使用的是内网IP,公网IP是使用路由器将家用地址的ip与端口映射到docker主机的ip了,所以也可以正常使用的。
2.3、拉取源代码
点击确定之后,我们进入到 project 的配置界面,我们找到 pipeline 这一部分。
我们可以把 pipeline 写入到 jenkinsfile,然后保存到代码根目录,也可以直接在这里填写,我们选择在这里填写。
pipeline {
    agent {
        docker {
            image 'node:14'
            args '-v $HOME/.m2:/root/.m2'
        }
    }
    stages {
        stage('checkout') {
            steps {
                git 'https://gitee.com/micoder/simple-node-js-react-npm-app.git'
            }
        }
    }
}
因为我们是构建 nodejs 项目,所以我们这里选择 node 的镜像,大家可以选择自己的版本,使用 docker 的好处就是,一些工具我们也不需要再去安装,
然后到系统工具配置了,直接选择自己需要的工具的 docker 镜像就可以了。
我们这里去拉取 github 的代码,如果语法不会的话,输入框下面有流水线语法器,可以随时去生成,也可以使用我们的 gitlab。
我们运行一下,看下输出结果如何。
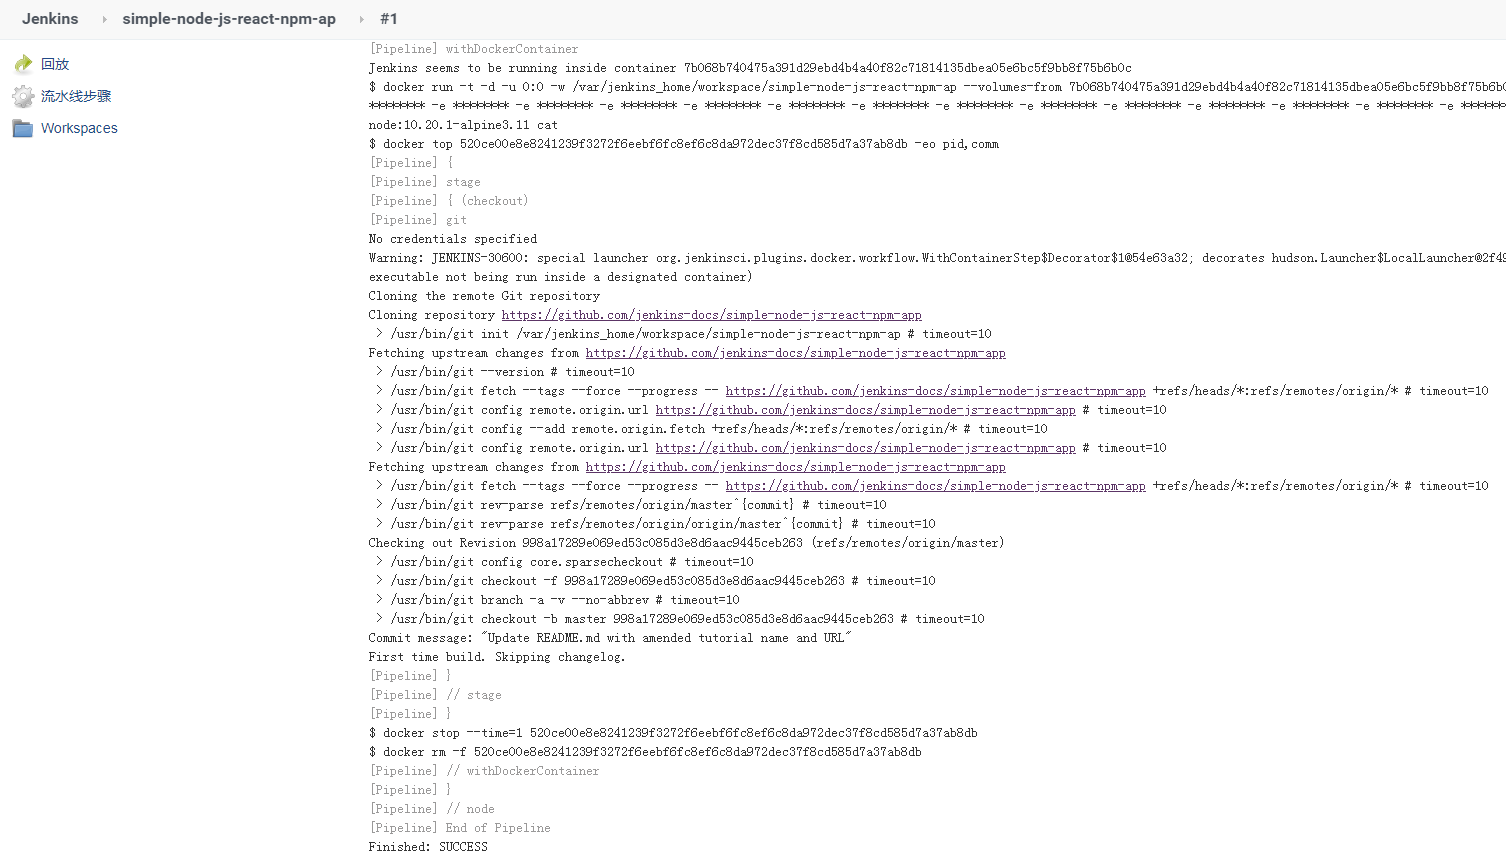
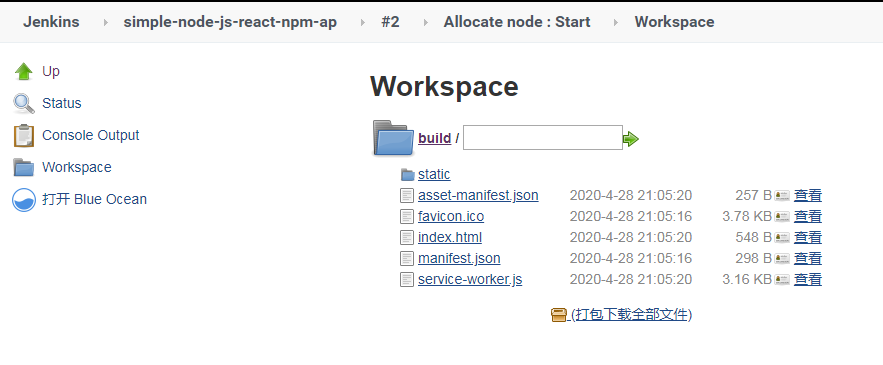
并且查看一下 workspace,看下载下来的代码

2.4、node.js 构建
那我们再完善一下 pipeline,我们增加打包构建。
pipeline {
    agent {
        docker {
            image 'node:14'
            args '-v $HOME/.m2:/root/.m2'
        }
    }
    stages {
        stage('checkout') {
            steps {
                git 'https://gitee.com/micoder/simple-node-js-react-npm-app.git'
            }
        }
        stage('build') {
            steps {
               sh 'npm install --registry=https://registry.npm.taobao.org'
               sh 'npm run build'
               sh 'ls -al'
            }
        }
    }
}
然后提交,查看一下运行结果如何:
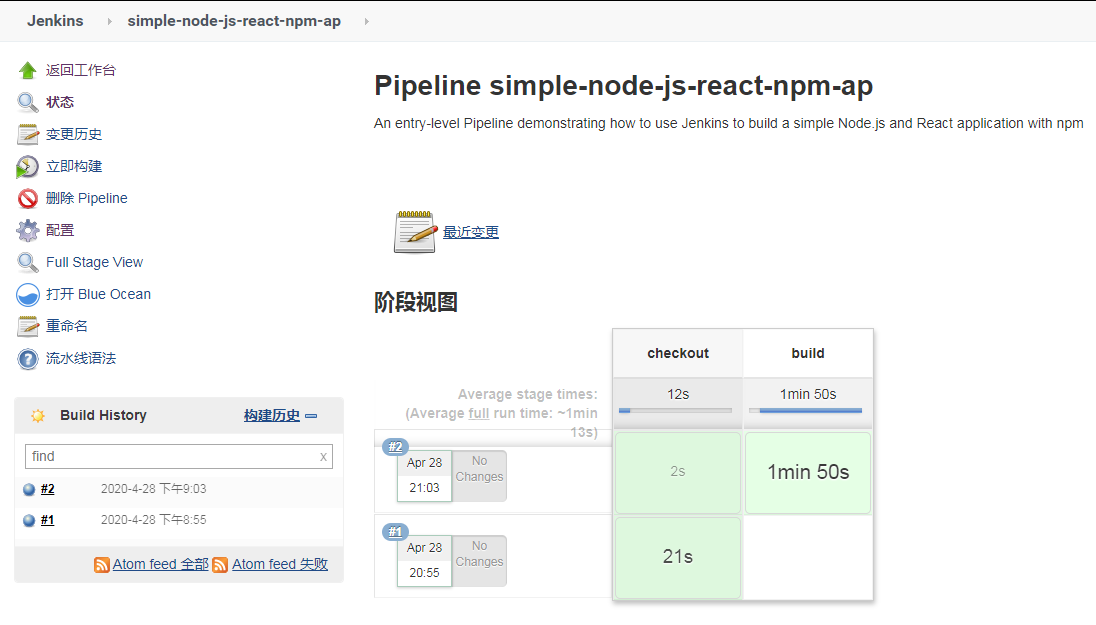
然后再查看一下 wordspace 里面构建的文件,构建的文件在 build 目录下面。我对代码也不是太清楚,有的好像生成在 dist 目录。
2.5、发布到服务器上面
这里我们还是选择插件 Publish over SSH,配置这个插件,我简要说一下。
下面只是一个公私钥的例子,也可以使用我最开始的账号密码。
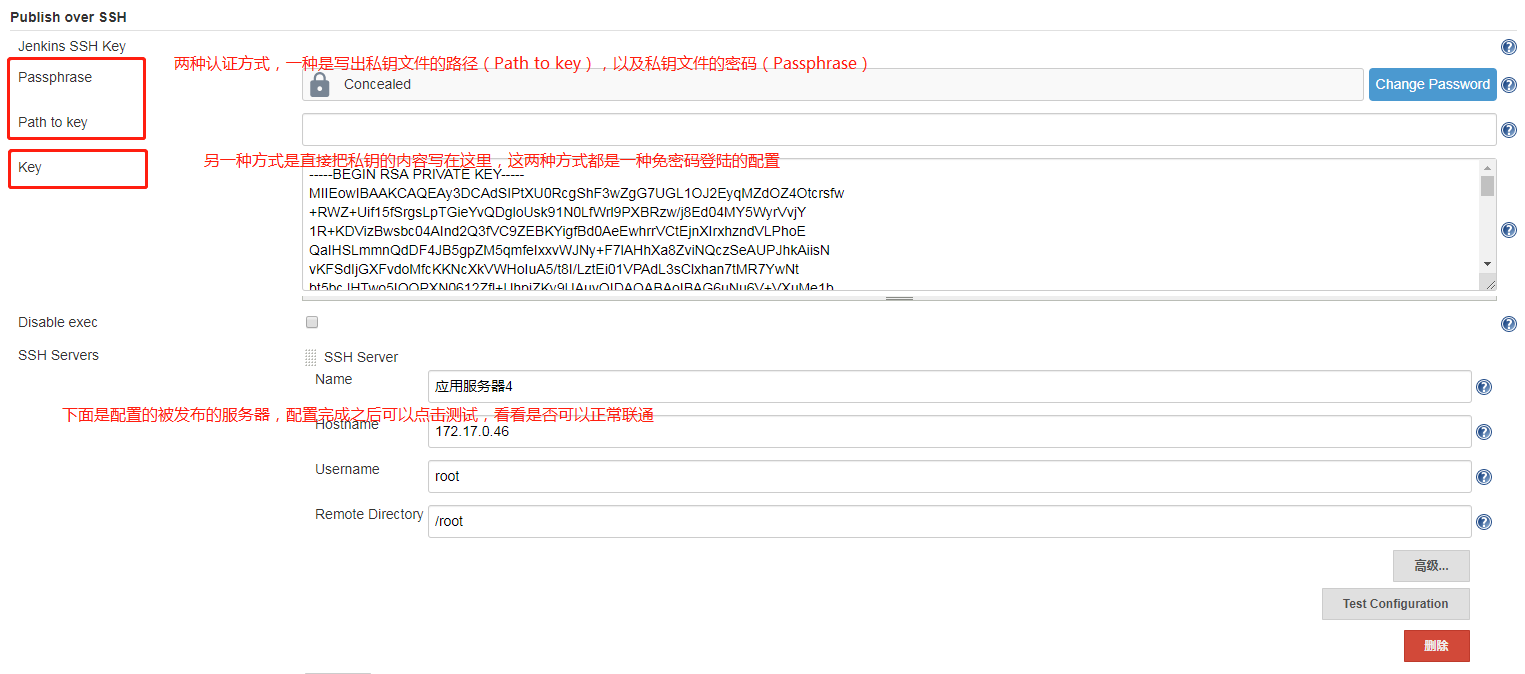
下面是通过 ssh的sftp功能传文件的流程。
打开 流水线语法 ,转入以下相关信息:
这里的 Remote Directory 比较重要,后面所有的文件都会传到以这个目录为根目录的目录下面。
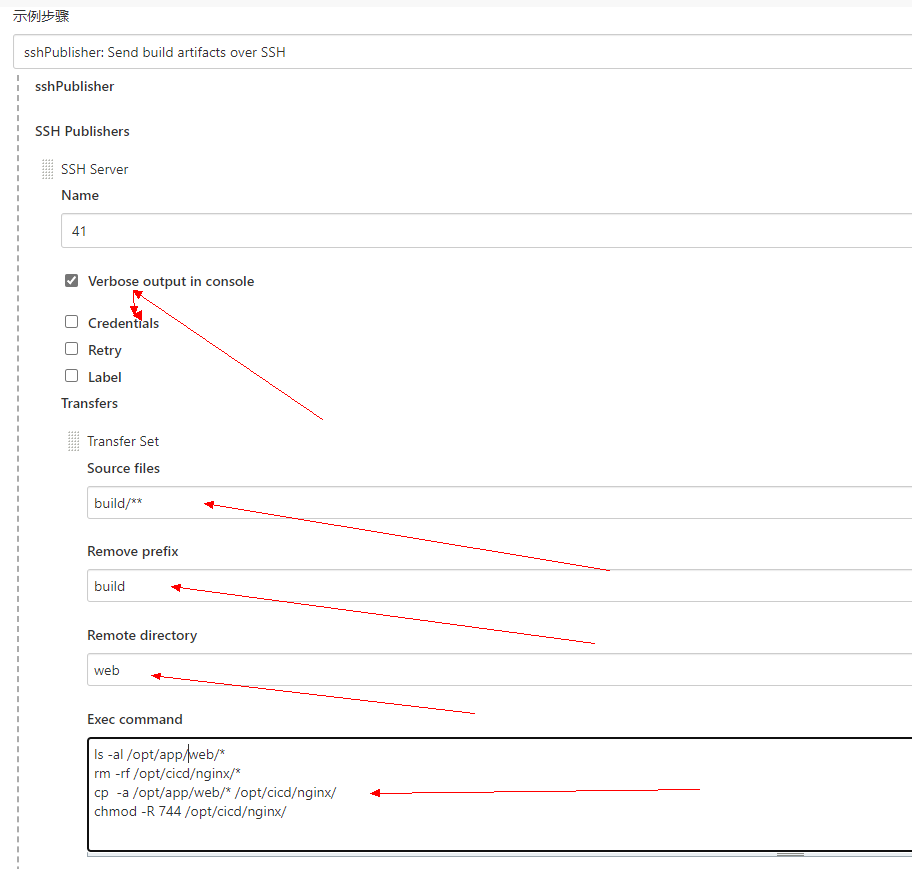
这里配置好了,但是我们要写 pipeline,这里我们只能借住流水线语法生成器,
我们这里计划把 build 里面的代码放到目标服务器的 /opt/cicd/nginx目录下面。
Source files:需要上传的文件(注意:相对于工作区的路径。看后面的配置可以填写多个,默认用,分隔),可以写
build/** ,注意,没填写好,只会上传第一级目录。
Remove prefix:移除前缀(只能指定Source files中的目录)。
Remote directory:远程目录(这里也是相对目录,目录根据我们配 ssh的时候填写的Remote Directory 路径,我写的是/opt/app,所以文件会被上传到我们的 /opt/app/web 目录下面。
最终的 pipeline 如下:
pipeline {
agent {
docker {
image 'node:14'
args '-v $HOME/.m2:/root/.m2'
}
}
stages {
stage('checkout') {
steps {
git 'https://gitee.com/micoder/simple-node-js-react-npm-app.git'
}
}
stage('build') {
steps {
sh 'npm install --registry=https://registry.npm.taobao.org'
sh 'npm run build'
sh 'ls -al'
}
}
stage('deploy') {
steps {
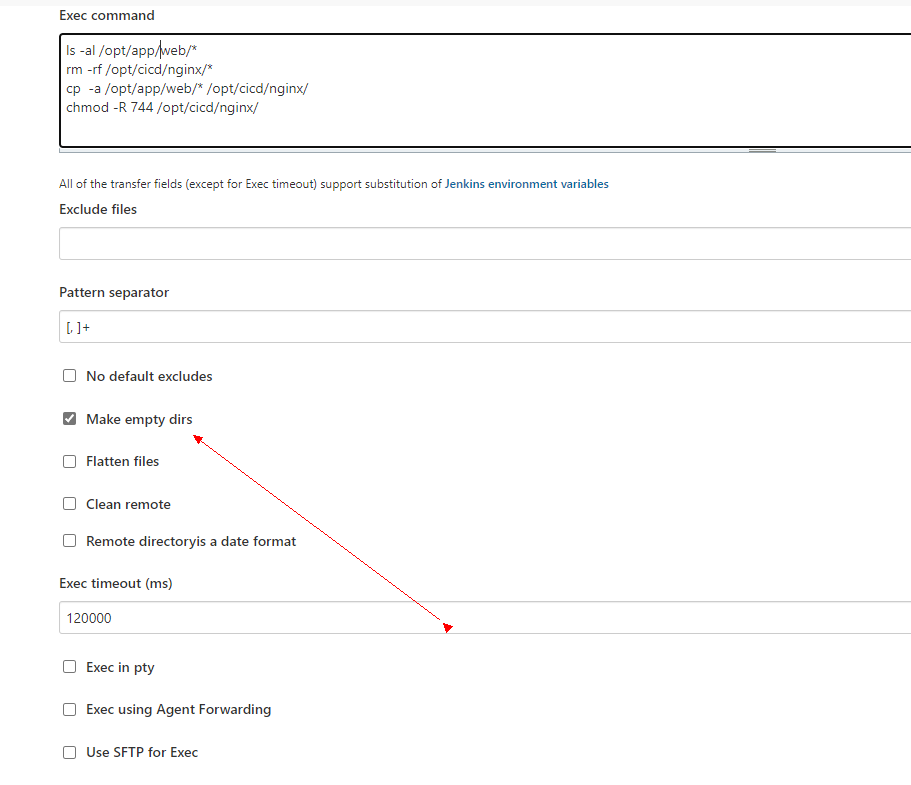
sshPublisher(publishers: [sshPublisherDesc(configName: '41', transfers: [sshTransfer(cleanRemote: false, excludes: '', execCommand: '''ls -al /opt/app/web/*
rm -rf /opt/cicd/nginx/*
cp -a /opt/app/web/* /opt/cicd/nginx/
chmod -R 744 /opt/cicd/nginx/
rm -rf /opt/app/web/*''', execTimeout: 120000, flatten: false, makeEmptyDirs: true, noDefaultExcludes: false, patternSeparator: '[, ]+', remoteDirectory: 'web', remoteDirectorySDF: false, removePrefix: 'build', sourceFiles: 'build/**')], usePromotionTimestamp: false, useWorkspaceInPromotion: false, verbose: true)])
}
}
}
}运行,我们查看一下结果是否如我们预期。完全实现目标。
下面是控制台输出信息:
Started by user yjvps
[Pipeline] Start of Pipeline
[Pipeline] node
Running on Jenkins in /var/jenkins_home/workspace/simple-node-js-react-npm-app
[Pipeline] {
[Pipeline] isUnix
[Pipeline] sh
+ docker inspect -f . node:14
.
[Pipeline] withDockerContainer
Jenkins seems to be running inside container 82d11d6bbc9e03f4bca5ee2332852a7efd8d75329a27d9516d7442e33173e596
$ docker run -t -d -u 0:0 -v $HOME/.m2:/root/.m2 -w /var/jenkins_home/workspace/simple-node-js-react-npm-app --volumes-from 82d11d6bbc9e03f4bca5ee2332852a7efd8d75329a27d9516d7442e33173e596 -e ******** -e ******** -e ******** -e ******** -e ******** -e ******** -e ******** -e ******** -e ******** -e ******** -e ******** -e ******** -e ******** -e ******** -e ******** -e ******** -e ******** -e ******** -e ******** -e ******** -e ******** -e ******** -e ******** -e ******** -e ******** -e ******** node:14 cat
$ docker top d750a4c9efa668faf6b6caab1b26545933f4819321b99f7e8874455d09136be1 -eo pid,comm
[Pipeline] {
[Pipeline] stage
[Pipeline] { (checkout)
[Pipeline] git
The recommended git tool is: NONE
No credentials specified
Warning: JENKINS-30600: special launcher org.jenkinsci.plugins.docker.workflow.WithContainerStep$Decorator$1@58f432a3; decorates hudson.Launcher$LocalLauncher@5633c7cd will be ignored (a typical symptom is the Git executable not being run inside a designated container)
> git rev-parse --resolve-git-dir /var/jenkins_home/workspace/simple-node-js-react-npm-app/.git # timeout=10
Fetching changes from the remote Git repository
> git config remote.origin.url https://gitee.com/micoder/simple-node-js-react-npm-app.git # timeout=10
Fetching upstream changes from https://gitee.com/micoder/simple-node-js-react-npm-app.git
> git --version # timeout=10
> git --version # 'git version 2.32.0'
> git fetch --tags --force --progress -- https://gitee.com/micoder/simple-node-js-react-npm-app.git +refs/heads/*:refs/remotes/origin/* # timeout=10
> git rev-parse refs/remotes/origin/master^{commit} # timeout=10
Checking out Revision fe2dd320e7d710bc7df6d4fd3824fbfadacc3602 (refs/remotes/origin/master)
> git config core.sparsecheckout # timeout=10
> git checkout -f fe2dd320e7d710bc7df6d4fd3824fbfadacc3602 # timeout=10
> git branch -a -v --no-abbrev # timeout=10
> git branch -D master # timeout=10
> git checkout -b master fe2dd320e7d710bc7df6d4fd3824fbfadacc3602 # timeout=10
Commit message: "add LICENSE."
> git rev-list --no-walk fe2dd320e7d710bc7df6d4fd3824fbfadacc3602 # timeout=10
[Pipeline] }
[Pipeline] // stage
[Pipeline] stage
[Pipeline] { (build)
[Pipeline] sh
+ npm install --registry=https://registry.npm.taobao.org
npm WARN @babel/plugin-bugfix-v8-spread-parameters-in-optional-chaining@7.16.0 requires a peer of @babel/core@^7.13.0 but none is installed. You must install peer dependencies yourself.
npm WARN tsutils@3.21.0 requires a peer of typescript@>=2.8.0 || >= 3.2.0-dev || >= 3.3.0-dev || >= 3.4.0-dev || >= 3.5.0-dev || >= 3.6.0-dev || >= 3.6.0-beta || >= 3.7.0-dev || >= 3.7.0-beta but none is installed. You must install peer dependencies yourself.
npm WARN optional SKIPPING OPTIONAL DEPENDENCY: fsevents@2.3.2 (node_modules/fsevents):
npm WARN notsup SKIPPING OPTIONAL DEPENDENCY: Unsupported platform for fsevents@2.3.2: wanted {"os":"darwin","arch":"any"} (current: {"os":"linux","arch":"x64"})
npm WARN optional SKIPPING OPTIONAL DEPENDENCY: fsevents@1.2.13 (node_modules/watchpack-chokidar2/node_modules/fsevents):
npm WARN notsup SKIPPING OPTIONAL DEPENDENCY: Unsupported platform for fsevents@1.2.13: wanted {"os":"darwin","arch":"any"} (current: {"os":"linux","arch":"x64"})
npm WARN optional SKIPPING OPTIONAL DEPENDENCY: fsevents@1.2.13 (node_modules/webpack-dev-server/node_modules/fsevents):
npm WARN notsup SKIPPING OPTIONAL DEPENDENCY: Unsupported platform for fsevents@1.2.13: wanted {"os":"darwin","arch":"any"} (current: {"os":"linux","arch":"x64"})
up to date in 20.617s
155 packages are looking for funding
run `npm fund` for details
[Pipeline] sh
+ npm run build
> my-app@0.1.0 build /var/jenkins_home/workspace/simple-node-js-react-npm-app
> react-scripts build
Creating an optimized production build...
Compiled successfully.
File sizes after gzip:
40.2 KB build/static/js/2.a8433ee8.chunk.js
1.01 KB build/static/js/main.220a0739.chunk.js
771 B build/static/js/runtime-main.7a1bfce0.js
302 B build/static/css/main.eeeddbdb.chunk.css
The project was built assuming it is hosted at /.
You can control this with the homepage field in your package.json.
The build folder is ready to be deployed.
You may serve it with a static server:
npm install -g serve
serve -s build
Find out more about deployment here:
https://cra.link/deployment
[Pipeline] sh
+ ls -al
total 716
drwxr-xr-x 8 root root 4096 Dec 19 13:05 .
drwxr-xr-x 7 root root 4096 Dec 18 10:50 ..
drwxr-xr-x 8 root root 4096 Dec 19 13:05 .git
-rw-r--r-- 1 root root 65 Dec 18 10:22 .gitattributes
-rw-r--r-- 1 root root 893 Dec 18 10:22 .gitignore
-rw-r--r-- 1 root root 11357 Dec 18 10:44 LICENSE
-rw-r--r-- 1 root root 782 Dec 18 10:44 README.md
drwxr-xr-x 3 root root 100 Dec 19 13:05 build
drwxr-xr-x 3 root root 38 Dec 18 10:22 jenkins
drwxr-xr-x 1032 root root 28672 Dec 19 13:05 node_modules
-rw-r--r-- 1 root root 640892 Dec 18 10:52 package-lock.json
-rw-r--r-- 1 root root 573 Dec 19 13:05 package.json
drwxr-xr-x 2 root root 61 Dec 18 10:22 public
drwxr-xr-x 2 root root 128 Dec 18 10:22 src
[Pipeline] }
[Pipeline] // stage
[Pipeline] stage
[Pipeline] { (deploy)
[Pipeline] sshPublisher
SSH: Connecting from host [jenkins]
SSH: Connecting with configuration [41] ...
SSH: Creating session: username [root], hostname [192.168.1.41], port [22]
SSH: Connecting session ...
SSH: Connected
SSH: Opening SFTP channel ...
SSH: SFTP channel open
SSH: Connecting SFTP channel ...
SSH: Connected
SSH: cd [/opt/app]
SSH: OK
SSH: cd [/opt/app]
SSH: OK
SSH: mkdir [web]
SSH: OK
SSH: cd [web]
SSH: OK
SSH: put [asset-manifest.json]
SSH: OK
SSH: put [favicon.ico]
SSH: OK
SSH: put [index.html]
SSH: OK
SSH: put [manifest.json]
SSH: OK
SSH: cd [/opt/app]
SSH: OK
SSH: cd [web]
SSH: OK
SSH: mkdir [static]
SSH: OK
SSH: cd [static]
SSH: OK
SSH: mkdir [css]
SSH: OK
SSH: cd [css]
SSH: OK
SSH: put [main.eeeddbdb.chunk.css]
SSH: OK
SSH: put [main.eeeddbdb.chunk.css.map]
SSH: OK
SSH: cd [/opt/app]
SSH: OK
SSH: cd [web]
SSH: OK
SSH: cd [static]
SSH: OK
SSH: mkdir [js]
SSH: OK
SSH: cd [js]
SSH: OK
SSH: put [2.a8433ee8.chunk.js]
SSH: OK
SSH: put [2.a8433ee8.chunk.js.LICENSE.txt]
SSH: OK
SSH: put [2.a8433ee8.chunk.js.map]
SSH: OK
SSH: put [main.220a0739.chunk.js]
SSH: OK
SSH: put [main.220a0739.chunk.js.map]
SSH: OK
SSH: put [runtime-main.7a1bfce0.js]
SSH: OK
SSH: put [runtime-main.7a1bfce0.js.map]
SSH: OK
SSH: cd [/opt/app]
SSH: OK
SSH: cd [web]
SSH: OK
SSH: cd [static]
SSH: OK
SSH: mkdir [media]
SSH: OK
SSH: cd [media]
SSH: OK
SSH: put [logo.103b5fa1.svg]
SSH: OK
SSH: Opening exec channel ...
SSH: EXEC: channel open
SSH: EXEC: STDOUT/STDERR from command [ls -al /opt/app/web/*
rm -rf /opt/cicd/nginx/*
cp -a /opt/app/web/* /opt/cicd/nginx/
chmod -R 744 /opt/cicd/nginx/
rm -rf /opt/app/web/*] ...
SSH: EXEC: connected
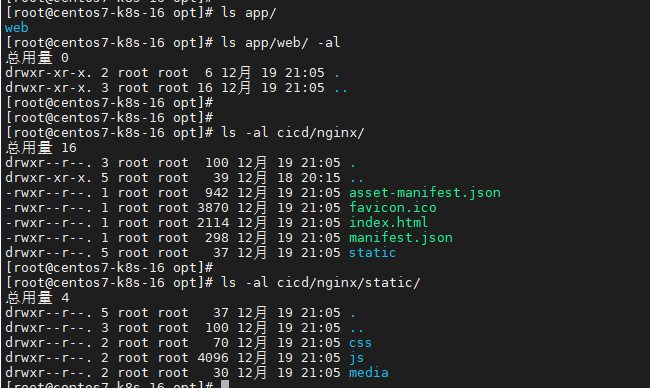
-rw-r--r--. 1 root root 942 12月 19 21:05 /opt/app/web/asset-manifest.json
-rw-r--r--. 1 root root 3870 12月 19 21:05 /opt/app/web/favicon.ico
-rw-r--r--. 1 root root 2114 12月 19 21:05 /opt/app/web/index.html
-rw-r--r--. 1 root root 298 12月 19 21:05 /opt/app/web/manifest.json
/opt/app/web/static:
总用量 4
drwxr-xr-x. 5 root root 37 12月 19 21:05 .
drwxr-xr-x. 3 root root 100 12月 19 21:05 ..
drwxr-xr-x. 2 root root 70 12月 19 21:05 css
drwxr-xr-x. 2 root root 4096 12月 19 21:05 js
drwxr-xr-x. 2 root root 30 12月 19 21:05 media
SSH: EXEC: completed after 201 ms
SSH: Disconnecting configuration [41] ...
SSH: Transferred 14 file(s)
[Pipeline] }
[Pipeline] // stage
[Pipeline] }
$ docker stop --time=1 d750a4c9efa668faf6b6caab1b26545933f4819321b99f7e8874455d09136be1
$ docker rm -f d750a4c9efa668faf6b6caab1b26545933f4819321b99f7e8874455d09136be1
[Pipeline] // withDockerContainer
[Pipeline] }
[Pipeline] // node
[Pipeline] End of Pipeline
Finished: SUCCESS
我们在第二步构建完成之后,可以使用 zip 命令对这个文件夹打包,然后我们再使用第三步去获取,我这里不进行演示了,大家请自行测试。
三、最佳实践
Customizing the execution environment
Pipeline is designed to easily use Docker images as the execution environment for a single Stage or the entire Pipeline. Meaning that a user can define the tools required for their Pipeline, without having to manually configure agents. Practically any tool which can be packaged in a Docker container. can be used with ease by making only minor edits to a Jenkinsfile.
pipeline {
    agent {
        docker { image 'node:7-alpine' }
    }
    stages {
        stage('Test') {
            steps {
                sh 'node --version'
            }
        }
    }
}
Caching data for containers
Many build tools will download external dependencies and cache them locally for future re-use. Since containers are initially created with "clean" file systems, this can result in slower Pipelines, as they may not take advantage of on-disk caches between subsequent Pipeline runs.
Pipeline supports adding custom arguments which are passed to Docker, allowing users to specify custom Docker Volumes to mount, which can be used for caching data on the agent between Pipeline runs. The following example will cache ~/.m2 between Pipeline runs utilizing the maven container, thereby avoiding the need to re-download dependencies for subsequent runs of the Pipeline.
pipeline {
    agent {
        docker {
            image 'maven:3-alpine'
            args '-v $HOME/.m2:/root/.m2'
        }
    }
    stages {
        stage('Build') {
            steps {
                sh 'mvn -B'
            }
        }
    }
}
Using multiple containers
It has become increasingly common for code bases to rely on multiple, different, technologies. For example, a repository might have both a Java-based back-end API implementation and a JavaScript-based front-end implementation. Combining Docker and Pipeline allows a Jenkinsfile to use multiple types of technologies by combining the agent {} directive, with different stages.
pipeline {
    agent none
    stages {
        stage('Back-end') {
            agent {
                docker { image 'maven:3-alpine' }
            }
            steps {
                sh 'mvn --version'
            }
        }
        stage('Front-end') {
            agent {
                docker { image 'node:7-alpine' }
            }
            steps {
                sh 'node --version'
            }
        }
    }
}
Using a Dockerfile
For projects which require a more customized execution environment, Pipeline also supports building and running a container from a Dockerfile in the source repository. In contrast to the previous approach of using an "off-the-shelf" container, using the agent { dockerfile true } syntax will build a new image from a Dockerfile rather than pulling one from Docker Hub.
Re-using an example from above, with a more custom Dockerfile:
Dockerfile
FROM node:7-alpine

RUN apk add -U subversion
By committing this to the root of the source repository, the Jenkinsfile can be changed to build a container based on this Dockerfile and then run the defined steps using that container:
Jenkinsfile (Declarative Pipeline)
pipeline {
    agent { dockerfile true }
    stages {
        stage('Test') {
            steps {
                sh 'node --version'
                sh 'svn --version'
            }
        }
    }
}
The agent { dockerfile true } syntax supports a number of other options which are described in more detail in the Pipeline Syntax section.
Advanced Usage with Scripted Pipeline
Running "sidecar" containers
Using Docker in Pipeline can be an effective way to run a service on which the build, or a set of tests, may rely. Similar to the sidecar pattern, Docker Pipeline can run one container "in the background", while performing work in another. Utilizing this sidecar approach, a Pipeline can have a "clean" container provisioned for each Pipeline run.
Consider a hypothetical integration test suite which relies on a local MySQL database to be running. Using the withRun method, implemented in the Docker Pipeline plugin’s support for Scripted Pipeline, a Jenkinsfile can run MySQL as a sidecar:
node {
    checkout scm
    /*
     * In order to communicate with the MySQL server, this Pipeline explicitly
     * maps the port (`3306`) to a known port on the host machine.
     */
    docker.image('mysql:5').withRun('-e "MYSQL_ROOT_PASSWORD=my-secret-pw" -p 3306:3306') { c ->
        /* Wait until mysql service is up */
        sh 'while ! mysqladmin ping -h0.0.0.0 --silent; do sleep 1; done'
        /* Run some tests which require MySQL */
        sh 'make check'
    }
}
This example can be taken further, utilizing two containers simultaneously. One "sidecar" running MySQL, and another providing the execution environment, by using the Docker container links.
node {
    checkout scm
    docker.image('mysql:5').withRun('-e "MYSQL_ROOT_PASSWORD=my-secret-pw"') { c ->
        docker.image('mysql:5').inside("--link ${c.id}:db") {
            /* Wait until mysql service is up */
            sh 'while ! mysqladmin ping -hdb --silent; do sleep 1; done'
        }
        docker.image('centos:7').inside("--link ${c.id}:db") {
            /*
             * Run some tests which require MySQL, and assume that it is
             * available on the host name `db`
             */
            sh 'make check'
        }
    }
}
The above example uses the object exposed by withRun, which has the running container’s ID available via the id property. Using the container’s ID, the Pipeline can create a link by passing custom Docker arguments to the inside() method.
The id property can also be useful for inspecting logs from a running Docker container before the Pipeline exits:
sh "docker logs ${c.id}"Building containers
In order to create a Docker image, the Docker Pipeline plugin also provides a build() method for creating a new image, from a Dockerfile in the repository, during a Pipeline run.
One major benefit of using the syntax docker.build("my-image-name") is that a Scripted Pipeline can use the return value for subsequent Docker Pipeline calls, for example:
node {
    checkout scm

    def customImage = docker.build("my-image:${env.BUILD_ID}")

    customImage.inside {
        sh 'make test'
    }
}
The return value can also be used to publish the Docker image to Docker Hub, or a custom Registry, via the push() method, for example:
node {
    checkout scm
    def customImage = docker.build("my-image:${env.BUILD_ID}")
    customImage.push()
}
One common usage of image "tags" is to specify a latest tag for the most recently, validated, version of a Docker image. The push() method accepts an optional tag parameter, allowing the Pipeline to push the customImage with different tags, for example:
node {
    checkout scm
    def customImage = docker.build("my-image:${env.BUILD_ID}")
    customImage.push()

    customImage.push('latest')
}
The build() method builds the Dockerfile in the current directory by default. This can be overridden by providing a directory path containing a Dockerfile as the second argument of the build() method, for example:
node {
    checkout scm
    def testImage = docker.build("test-image", "./dockerfiles/test")

    testImage.inside {
        sh 'make test'
    }
}
Builds
test-imagefrom the Dockerfile found at./dockerfiles/test/Dockerfile.
It is possible to pass other arguments to docker build by adding them to the second argument of the build() method. When passing arguments this way, the last value in the that string must be the path to the docker file and should end with the folder to use as the build context)
This example overrides the default Dockerfile by passing the -f flag:
node {
    checkout scm
    def dockerfile = 'Dockerfile.test'
    def customImage = docker.build("my-image:${env.BUILD_ID}", "-f ${dockerfile} ./dockerfiles")
}
Builds
my-image:${env.BUILD_ID}from the Dockerfile found at./dockerfiles/Dockerfile.test.
Using a remote Docker server
By default, the Docker Pipeline plugin will communicate with a local Docker daemon, typically accessed through /var/run/docker.sock.
To select a non-default Docker server, such as with Docker Swarm, the withServer() method should be used.
By passing a URI, and optionally the Credentials ID of a Docker Server Certificate Authentication pre-configured in Jenkins, to the method with:
node {
    checkout scm

    docker.withServer('tcp://swarm.example.com:2376', 'swarm-certs') {
        docker.image('mysql:5').withRun('-p 3306:3306') {
            /* do things */
        }
    }
}
Using a custom registry
By default the Docker Pipeline integrates assumes the default Docker Registry of Docker Hub.
In order to use a custom Docker Registry, users of Scripted Pipeline can wrap steps with the withRegistry() method, passing in the custom Registry URL, for example:
node {
    checkout scm

    docker.withRegistry('https://registry.example.com') {

        docker.image('my-custom-image').inside {
            sh 'make test'
        }
    }
}
For a Docker Registry which requires authentication, add a "Username/Password" Credentials item from the Jenkins home page and use the Credentials ID as a second argument to withRegistry():
node {
    checkout scm

    docker.withRegistry('https://registry.example.com', 'credentials-id') {

        def customImage = docker.build("my-image:${env.BUILD_ID}")

        /* Push the container to the custom Registry */
        customImage.push()
    }
}目录 返回
首页